Like other guitars, electric guitars may alter action for many reasons. Players should regularly adjust their electric guitar’s action. It affects how simple the guitar is to play, handle, and sound.
Due to electric guitars’ varied hardware and configuration choices, players must keep several things in mind. Today, E Guitar Mania‘ll discuss everything that makes changing your electric guitar’s action simple.
What is Action Meaning On An Electric Guitar?
“Action” is how high your guitar strings are above the frets. Consider it the sweet spot that lets you rock out without a buzz. It allows your fingers to slide across the fretboard!
After setting up, you’ll need to decide whether to raise, lower, or leave it. Every guitarist has a preferred motion. For smooth, fast fretwork, Jimmy Page uses a lower action, whereas John Mayer uses a higher action to emphasize his bluesy bends and heavy strumming.
The kind of bridge on an electric guitar also affects action adjustment. Some bridges enable string height modifications, while others modify bridge height. Adjusting acoustic guitar saddle height is typical. It’s crucial to tune the guitar carefully to maintain its playability and tone.
The two kinds of action
High Action
Pros: You’ll love how it lets you dig in with your pick for a richer sound, free from the dreaded fret buzz.
Cons: But, be warned, your fingers will need to work harder, which might make your notes unintentionally sharp.
Low Action
Pros: Perfect for when you want to glide effortlessly through fast passages or nail those hammer-ons without breaking a sweat.
Cons: However, it’s a bit of a tightrope – too low, and you might find your strings buzzing or your bends muddling into other strings.
How to Measure The Action On An Electric Guitar?
You need a small ruler or a special tool that measures really tiny spaces. This helps you see how high the strings are from the fretboard.
Make sure your guitar is in tune. Tuning changes how the strings pull on the neck. This affects how high or low the strings sit.
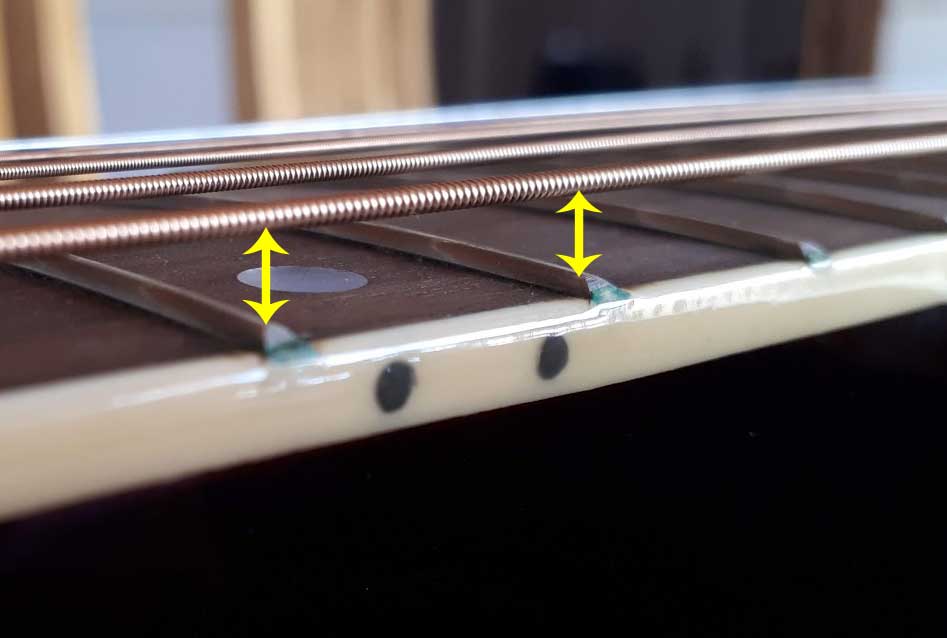
Using the 12th Fret
We mostly look at the 12th fret to see how high the strings are. You measure from the top of this fret to the bottom of the strings.
Put your ruler straight up and down right next to the 12th fret.
Check how far the string is from the fret. Do this for the thickest and thinnest strings to see both sides.
Don’t forget about the nut (the little bar at the end of the fretboard). Seeing how high the strings are at the first fret tells you a lot.
People like different setups, but a good starting point is about 2mm for the thick string and 1.5mm for the thin one at the 12th fret. This setup makes playing smooth without any annoying buzz.
And remember to stick to one way of measuring. Use either millimeters or inches, but don’t mix them up. It keeps things simple.
If the strings are too high or too low for your liking, it might be time to adjust. What feels best can be different for everyone.
By checking your guitar’s action like this, you can make sure it’s super comfy to play and sounds awesome.
How tight and loose strings affect the sound on your electric guitar?
The strings feel harder when you tighten them. This can make the sound last longer but also makes the strings harder to push down. It’s like tightening a rubber band – the tighter it is, the harder to stretch but the longer it twangs.
If you loosen the strings, they get easier to bend and wiggle. You can make cool sounds like bends and vibrato with this. To change the pitch, you push on the strings and make bends. A vibrato is a quick move that makes the note shake.
If the strings are too loose, though, they might sound floppy and not sing out for long. Also, bending the strings too easily might make it hard to hit the right notes.
So it’s all about getting to a good space. You want the strings to be just tight enough to make a long, clear sound, but not so tight that it’s hard to bend them and move them around.
How to Adjust Action On An Electric Guitar?
You now understand the consequences of failed action. We will now go into depth on how to change the action of your electric guitar, so that you may play it to your liking. The key is to find the balance. Too high and you’re fighting your strings; too low and you may miss the sound.
Truss rod, saddle, and bridge affect electric guitar action. Check out how to alter these parts.
Tools You’ll Need:
- Hex Keys (Allen Wrenches): For turning saddle height screws.
- Screwdrivers: For adjusting bridge height or screws.
- String Action Gauge (a ruler): To measure string height accurately.
- Tuner: To keep your guitar in tune during adjustments.
- Capo (optional): Helpful for some adjustment techniques.
- Radius Gauge (optional): To match string height with the fretboard’s curve.
Truss Rod Adjustment
Firts, you will need to find the truss rod. It’s usually at the top of the neck or inside the hole.
After that, check the curve, push down the first and last frets on the big string. Look at the gap at the 8th fret. A big gap means you need to adjust.
Here’s how adjusting the dual action truss rod work:
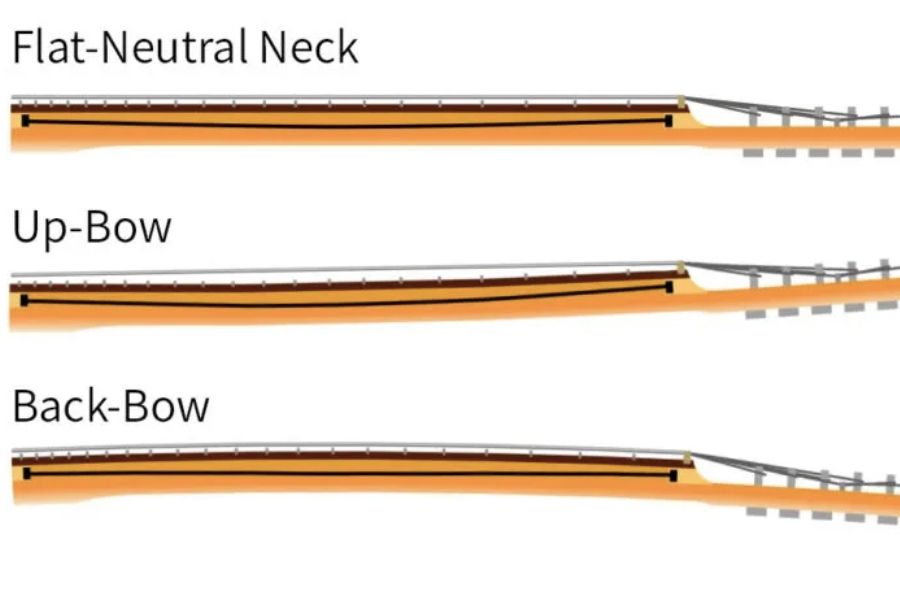
There are actually two conditions that you need to fix on your electric guitar, which is backbow and upbow. The backbow of the truss rod causes your guitar’s low action and in reverse, the upbow causes high actions. For each of this case:
Bending Backward (To fix upkbow): When you loosen the truss rod past the neutral zone, it can push the neck backward. This is useful if the neck is too straight or has a backward bow you want to correct.
Bending Forward (To fix backbow): To make the neck bend forward (which is the opposite action), you tighten the truss rod. This pulls the neck towards the strings, countering the backward bow or making the neck straighter if it’s too bent backwards. You do this adjustment before the truss rod enters the neutral zone from the tight side.
In simple terms, think of the truss rod as a tool to move the neck in two directions:
- Tighten it (turn it clockwise) to pull the neck forward, helping if the neck is too straight or bent backward.
- Loosen it (turn it counter-clockwise) to let the neck go backward, useful if the neck is too bent forward.
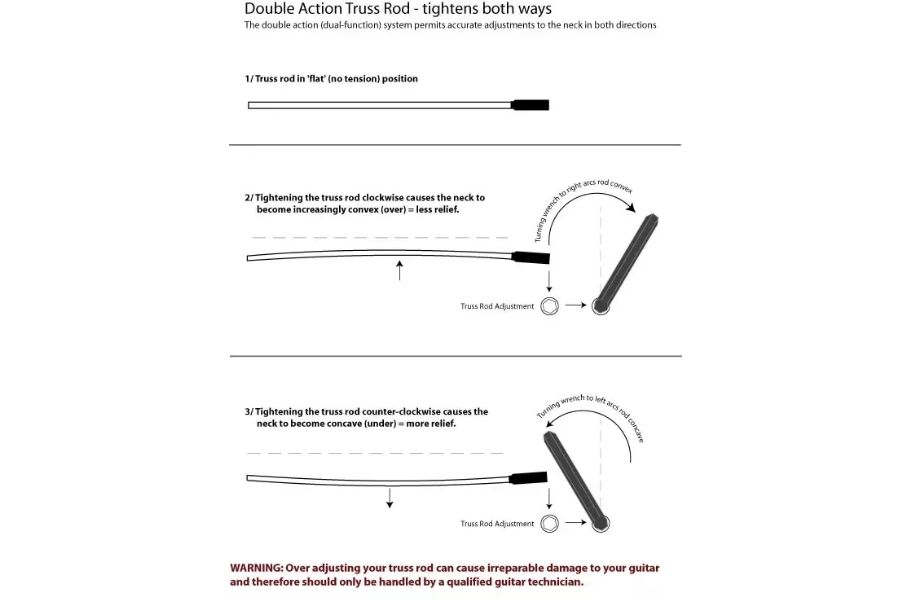
The action of tightening the dual-action truss rod from its neutral or loosened state moves the neck forward, correcting forward bows or excessive curvature towards the strings.
Why the neck have back bow?
Tension of the strings, which often means bending forward due to the pull of the strings. Tightening the truss rod straightens the neck against this pull, while loosening it allows the natural forward bow to reassert itself. So an upbow electric guitar makes sense. Discuss why they sometimes suffers from backbow!
A neck might bend backward, creating what’s called a “backbow,” for a few reasons, not just from string pull:
- Too Tight Truss Rod: Tighten the truss rod too much, and the neck bends back. It’s pushing too hard the other way.
- Weather Stuff: Wood changes with the weather. Dry air makes it shrink and bend back. Wet air makes it puff up and bend forward.
- Light Strings: If the strings you used are thinner than before, they pull less. This can make the neck bend back if the truss rod was set for heavier strings.
- Wood Moves: Wood can warp or settle over time. This might make the neck bend back, especially if it’s not kept in a good place.
So, strings always pull the neck forward, but these things can push it back. Adjusting the truss rod helps keep the neck just right for playing.
Differences between single-action and dual-action truss rods
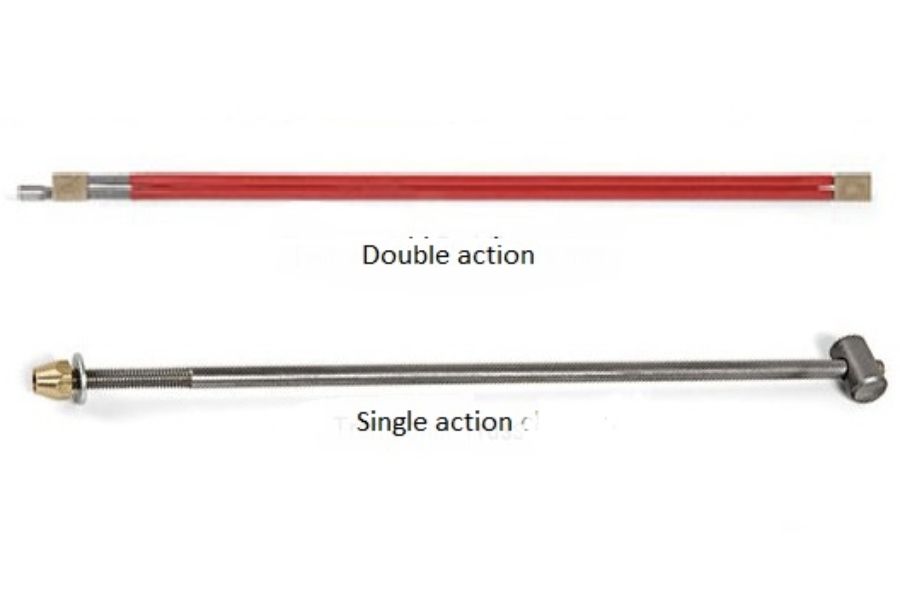
There are two popular types of truss rods that you will need to look at the features so that to what is yours and how you can deal with it.
Single-action truss rods were the first made. They’re simple and help stop the guitar neck from bending forward. You tighten it, and it makes the neck straight again. This was good enough for older guitars.
But, guitars have changed. They’re made of different stuff, and people play them in many ways. So, we needed a way to adjust the neck better.
About dual-action truss rods. They’re cooler because they can fix the neck if it bends forward or backward. This is great for when the weather changes or if you play your guitar hard. It keeps the neck just right.
Why have both types of truss rods? Well, some folks like the simple old-school single-action for certain guitars. Others prefer the new dual-action for more control. It really depends on what you need for your guitar and how you play.
Bridge Height And Saddle Adjustment
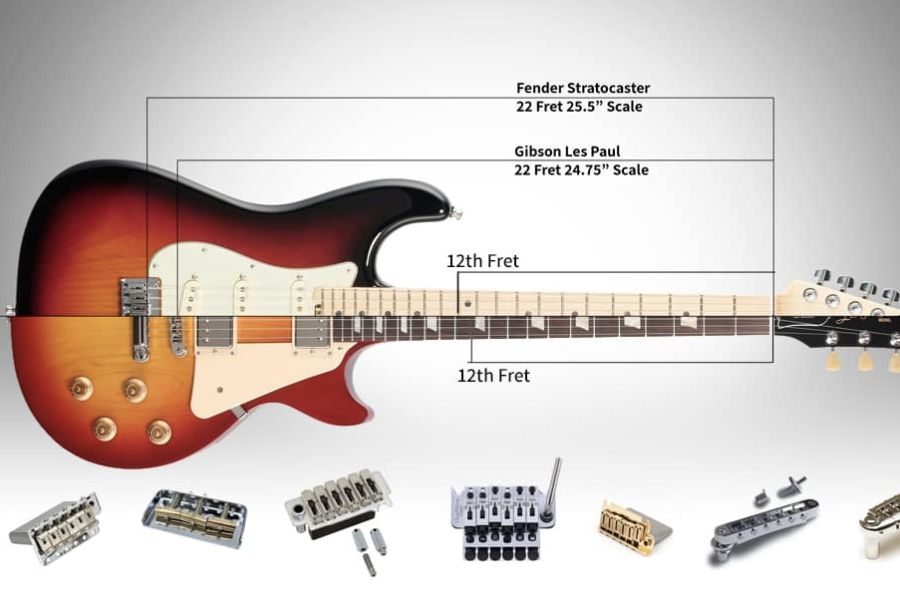
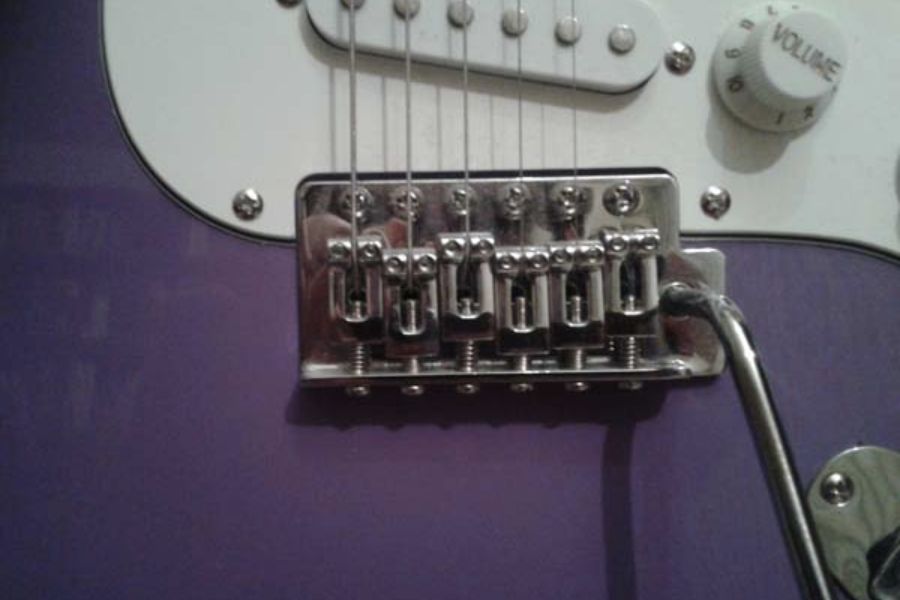
Many electric guitars, especially those with certain types of bridges like the Fender Stratocaster’s tremolo bridge or the Gibson Tune-o-Matic bridge, have individual saddles for each string.
Individual saddles allow players and technicians to adjust the height and intonation of each string independently, providing greater control over the guitar’s playability and sound. This feature is particularly important for electric guitars, which are often used in genres that require precise intonation for lead playing, chord clarity, and the use of various effects.
So, the fact that electric guitars often have individual saddles shows how flexible the instrument is and how important it is for electric guitar players to have a lot of setup choices.
Adjusting both saddles and the bridge on your electric guitar is a smart move. They work together to set how high the strings are.
The bridge decides how high all strings sit. The saddles let you tweak each string’s height. Doing both lets you fully customize your guitar’s feel. Here’s a step-by-step guide to help you through the process:
Different Types of Bridges
Since string height depends on the bridge and saddles, adjusting the action on an electric guitar requires both. The method varies by guitar bridge type. This guide covers electric guitar bridges:
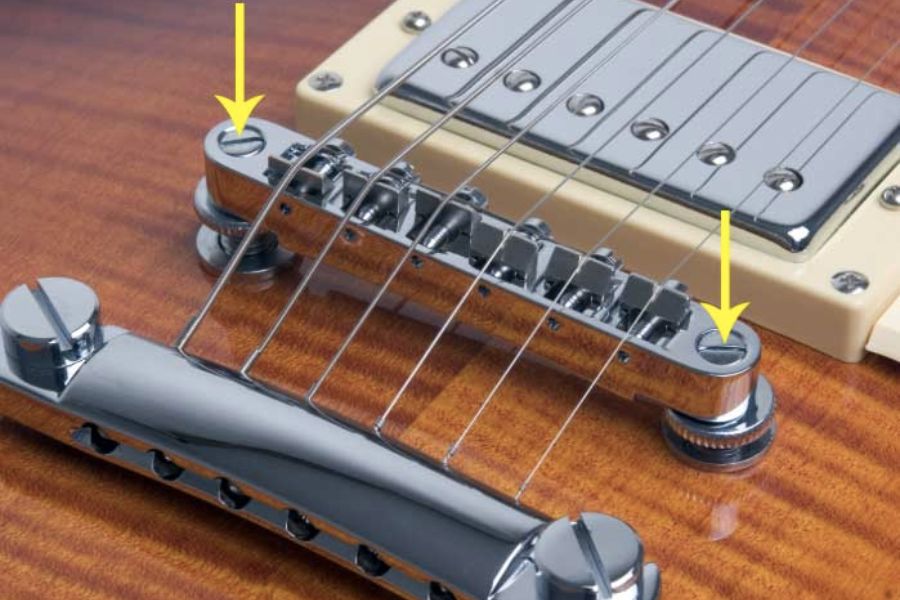
For Guitars with Tune-o-Matic Bridges (Common on Gibson Models):
Bridge Adjustment: Two thumbwheels or posts on either side of the Tune-o-Matic bridge let you change the overall action. When you turn these, the bridge can move up or down.
- To Raise Action: Turn the thumbwheels clockwise.
- To Lower Action: Turn them counter-clockwise.
Saddle Adjustment: The Tune-o-Matic bridge has individual saddles that primarily adjust for intonation, not height. Keeping each saddle aligned will maintain the fretboard’s radius, though.
For Guitars with Fender-Style Bridges (Common on Stratocasters):
Individual Saddle Adjustment: Each string sits on its own saddle, with two small screws for height adjustment.
- To Raise a String’s Action: Turn the screws counter-clockwise.
- To Lower a String’s Action: Turn the screws clockwise.
Adjust each saddle to match the fretboard’s radius, typically creating a slight arc that follows the curve of the fretboard.
Overall Bridge Height: Some models allow adjusting the bridge height by tightening or loosening the screws at the bridge’s perimeter. This is less common and usually pertains to vintage styles.
For Guitars with Floating Tremolo Systems (e.g., Floyd Rose):
Individual Saddle Adjustment: Similar to Fender-style, but with added complexity due to the bridge’s floating nature.
Adjust each saddle’s height screws to raise or lower the action. Maintain the fretboard’s radius for balanced playability.
Maintaining Bridge Balance: Adjustments should be made carefully to keep the bridge level with the guitar body. Significant height changes might require rebalancing the tremolo springs in the back cavity of the guitar.
Steps to Adjust the Action:
Now you have caught the idea of different types of bridge, let’s go through the detailed general steps to adjust the action on your electric guitar:
- Tuning: Start with your guitar tuned to pitch. This ensures adjustments are made under playing tension.
- Measuring Action: Measure the current action at the 12th fret with a ruler or action gauge. This gives you a baseline for adjustments.
- Adjusting Action: Identify your bridge type and follow the specific steps for saddle adjustment to raise or lower each string’s action.
- For Tune-o-Matic and some Fender-style bridges, you might also adjust the overall bridge height for a broader action change.
- Fine-Tuning: Make small adjustments, a quarter turn at a time, and frequently check the action by measuring and playing.
- Retuning and Checking: After adjusting the action, retune your guitar and play it to check for comfort and any buzzing and check for the intonation as action changes can affect intonation.
Additional Tips:
After much struggle and correcting, I will give you guys some recommendations to make the process more productive.
- Keep the fretboard’s radius in mind when adjusting saddles for a consistent feel across all strings.
- Document your starting points so you can revert back if needed.
- If unsure, consult a professional technician to avoid damage.
Differences Between Action vs Intonation
Many newbie into the guitar world can mistake the action on the guitar with the intonation, thinking that action and intonation are the same or that when you adjust the action on guitar, you are also adjusting the intonation.
Actually, action is the act of changing the string height above the fretboard to lowers or increase this distance on an electric guitar, and and intonation is the act of changing the length of the string.
Action
String Action: This is how high the strings are from the fretboard. High action means they’re far away, and low action means they’re close. High action can make a guitar harder to play but doesn’t change the sound much.
Neck Shape: Your guitar neck can bend a little, like a bow. If it bends forward, that’s an upbow. If it bends backward, that’s a backbow. These bends can make your guitar feel different when you play it, but they don’t really change the sound of the notes you play.
Intonation
Changing String Length is about how much of the string can wiggle when you play it. If you make the string longer, the sound goes lower. If you make it shorter, the sound goes higher. You can change this by moving the little piece at the end of the guitar (the bridge saddle) back and forth.
In Short:
Action and Neck make your guitar feel different to play but don’t really change how it sounds. They’re about making it comfy for your hands.
And the string length really is how you change the sound. Moving the bridge saddle to make the string longer or shorter will make the notes go lower or higher.
So, when you’re tuning your guitar or trying to get it to sound just right, remember that it’s not just about how it feels to play. Changing the length of the strings is your secret tool to make it sound perfect.
Changing the string height above the fretboard lowers the action on an electric guitar for better playability and comfort. The procedure might influence guitar intonation and playability.