The thought of building an electric guitar from scratch might not seem like a good idea, at first. Because it has so many complicated electrical and woodworking parts. But for people who are good at do-it-yourself projects, it’s totally doable and has a lot of benefits.
You can save money by building a guitar instead of buying a high-end one, and you can spread out the cost by buying parts as your budget allows. The cost of the tools at first might seem like a problem, but they end up being useful for other projects, like making more guitars or fixing old ones, so enthusiasts should see it as an investment that pays off.
Taking part in the building process also helps you learn more about how different parts of the guitar affect its sound and how easy it is to play. This can help you when you need to fix or modify other instruments in the future.
Here on Eguitar Mania, we’re going to show you how to build an electric guitar from scratch, and it will be the best DIY project you’ve ever done.
Preparation – Tools and Framework
Whether you have a small space in your basement with a drill and jigsaw or a fully-stocked workshop, building a guitar will probably require some specialized tools. If you find the idea of building a guitar appealing, you will likely view the practical work required as more of a rewarding challenge than a barrier. The tools you intend to use and the guitar components you decide to work with or create will often determine how involved you want to get in this project.
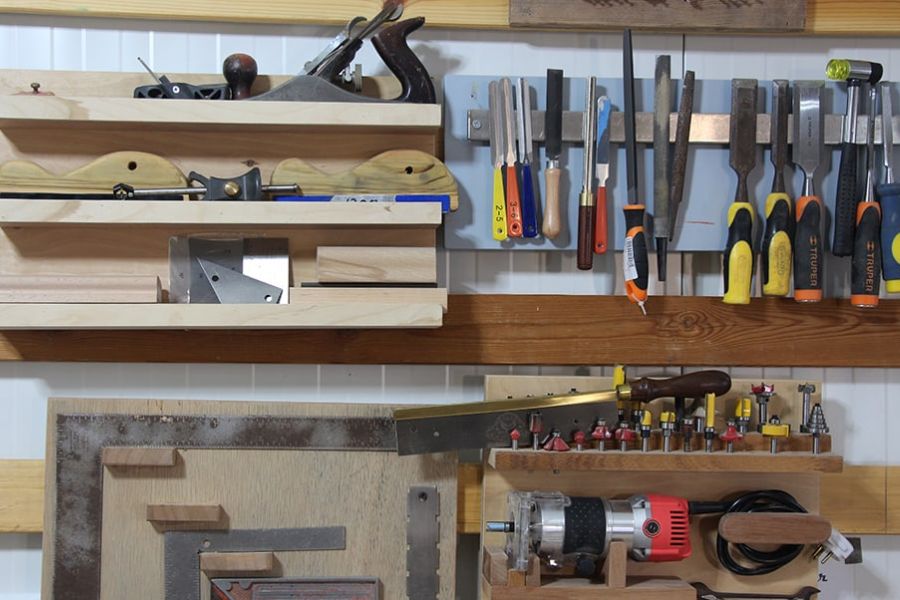
Tools Needed
| Tool Type | Specific Tool | Details | Optional |
| Router | Plunge Router | Skill router recommended | No |
| Router Bits | 1/4″ bit, 1/2″ bit with ball bearing guide, 1/2″ round over bit | – | No |
| Drill | Electric Drill | Basic model | No |
| Drill Bits | Bit Set, 6″ sanding disk (optional), 1/2″ Forstner Bit | Sanding disk for body carving, Forstner Bit for counter sinking neck ferrules | No |
| Saw | Jig Saw | With fine tooth blade for cutting plastic control covers | No |
| Sander | Belt Sander | For carving down top back body contour | Yes |
| Sander | Mouse or Orbital Sander | – | Yes |
| Tool | Dremel Tool | With sanding attachment for hard to reach sculpting areas | Yes |
| Drill | Drill Press | For drilling perfectly straight holes | Yes |
| Tool | Clamps | For laminating body blank or holding the neck in place during attachment | No |
| Soldering | Soldering Iron and Solder, Flux, Wire | For electronics assembly | No |
Basic Parts and Electronics
| Part Category | Specific Part | Details |
| Neck | Premade Neck | Building your own is difficult |
| Body | Body Blank | Birch Plywood or retailer purchased |
| Bridge | Type (e.g., hard tail) | Easily bolted on |
| Hardware | String Ferrules | If not using a Gibson style bridge |
| Tuners | High quality recommended | |
| Screws | For various guitar parts including pick guard, pickup rings, etc. | |
| Ferrules | For neck and strings, can use a neck plate instead | |
| Electronics | Pickups | Based on desired sound and budget |
| Pickup Rings | May need to buy screws separately for style consistency | |
| Control Knobs | Style to fit guitar design | |
| Potentiometers | For volume and tone control, quantity and type based on wiring schematic | |
| Input Jack | Long shaft recommended | |
| Capacitors | Value based on schematic | |
| Control Switch | Style varies (e.g., 5 way for Strats, 3 way for Les Pauls) | |
| Materials | Plastic | For control cavity cover, can be purchased from Stewart MacDonald |
Drawing and Drafting
The initial steps in crafting your dream electric guitar are largely about visualization, drawing, and drafting. This is where your ideas begin to take shape, and you lay the groundwork for the physical creation of the instrument.

Research and Inspiration
Start by imagining the kind of guitar you want. Consider its shape, size, color, and the specific features it will have. Think about the type of music you’ll play with it and what artists inspire you.
Look at different guitar designs for inspiration. There are various body styles, neck shapes, and hardware setups you can refer to. Research carefully to refine your vision, combining elements from existing guitars with unique ideas to create something new.
This information down below will guide your design choices from aesthetics to functionality.
Guitar Body
Some various iconic guitar body styles that can inspire your own design are:
- Stratocaster (Fender): Known for its double-cutaway body, allowing easier access to higher frets.
- Les Paul (Gibson): Single-cutaway, archtop body
- Telecaster (Fender): Single-cutaway body with a distinctive sharp edge and flat surface.
- SG (Gibson): Double-cutaway design that’s lighter than a Les Paul, offering excellent access to higher frets.
Neck Shapes
- C-Shape: Comfortable and rounded, suitable for a variety of playing styles. Found often on Fender guitars.
- U-Shape: Thicker and rounder, providing substantial grip, preferred for rhythm guitarists or players with larger hands.
- V-Shape: Features a pointed middle, which can be more comfortable for thumb-over or classical hand positions.
- D-Shape: Flatter in the middle with curved edges, providing a fast-playing surface ideal for lead guitarists.
Hardware Setups
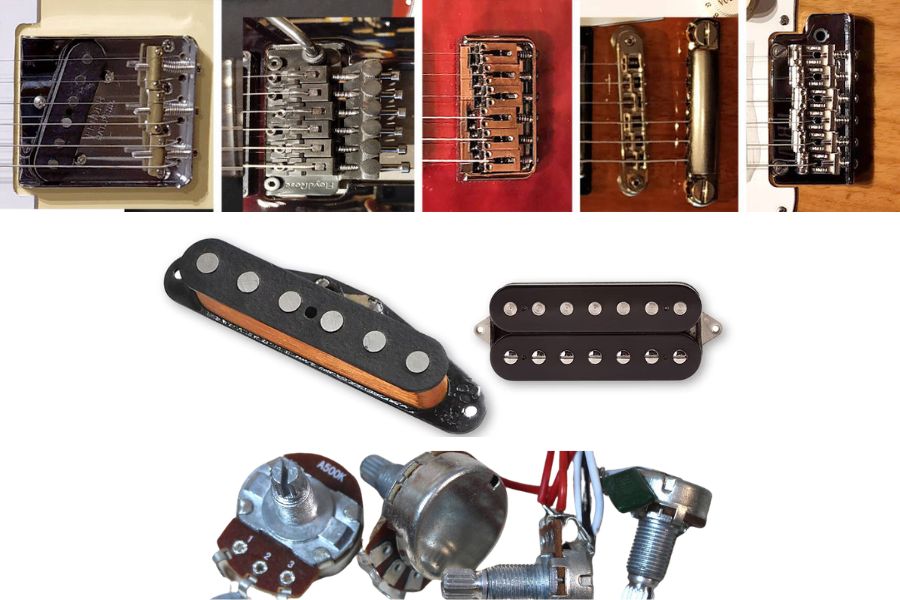
Make sure you’ve thought about all the hardware and electronics before you finish your template. Think about where you’ll put the pickups, bridge, tuners, and control knobs, which are all important parts. Where they are placed affects how the instrument works and how it can be played. In this step, you might need to change the body shape or cavity sizes depending on the parts you want to use, such as the bridge or pickups. Make sure that each part has enough room, and think about how they will fit into your design.
Tremolo/Vibrato Systems: With a whammy bar, you can change the pitch. The Floyd Rose and the Fender Synchronized Tremolo are two examples.
Fixed Bridges: Offers stability, long-term use, and ease of maintenance. The Telecaster-style bridge and the Tune-o-matic bridge are two examples.
Pickups: Most pick ups are either single coil or humbuckers.
- Single-Coil Pickups: Offer a bright and clear sound, typical of Stratocasters and Telecasters.
- Humbuckers: Les Pauls and SGs often have humbuckers, which make the sound warmer and fuller with less hum.
Locking Tuners: Helps in maintaining tuning stability, especially beneficial for guitars with tremolo systems.
Scale Length

It is very important to understand and pick the scale length early on. It changes the sound and feel of the guitar. You can find a guitar that fits your playing style and sound by measuring other guitars or using the lengths given by the manufacturer.
| Scale Length | Common Models | Characteristics | Typical Use Cases |
| 24″ | Fender Jaguar, Mustang | Easy string bending; warm tone; good for smaller hands. | Surf, indie rock, and players who prefer easier fretting and string bending. |
| 24.75″ | Gibson Les Paul, SG, ES-335 | Thicker, warmer tone; slightly lower string tension for easier bending. | Popular with rock, blues, and jazz fans for its rich, warm sound and ease of play. |
| 25″ | PRS (Paul Reed Smith) Custom 24 | Balanced brightness and warmth; adaptable. | Players seeking rock, metal, and jazz versatility. |
| 25.5″ | Fender Stratocaster, Telecaster | Brighter, twangier, and sustainier; higher string tension. | Lead guitarists, country, blues, and rock; great for clarity. |
| 27″+ (Baritone) | Various Baritone Models | In lower tunings, deep, resonant tone maintained string tension. | Metal, country, experimental; lower tunings without string tension loss. |
Sketch Preliminary Designs
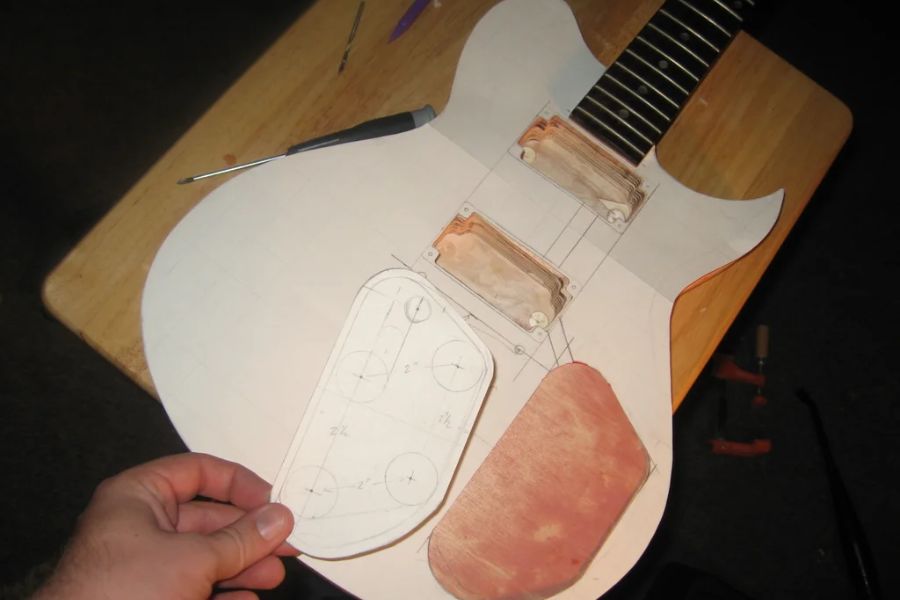
Now turn your ideas into a physical plan. The material you use should be strong, like poster board or thin wood. The drawing should have exact measurements and show how the guitar is put together, including the body’s thickness, how the neck is attached, and any electronic holes. This template will help you during the actual build, making sure that you cut and put together the guitar parts correctly.
Start drawing out your ideas on paper. Do not stress about getting everything right the first time. At this stage, you’ll try out different ideas and layouts. If you can, try drawing from different angles to get a better idea of the guitar’s size and how it fits in your hand.
Cutting and Sculpting
This is by far the most challenging and strenuous process in any DIY project. For an electric guitar project, you need to ensure that every cut and sculpt is exact in every move, so you don’t compromise your guitar’s performance later on.
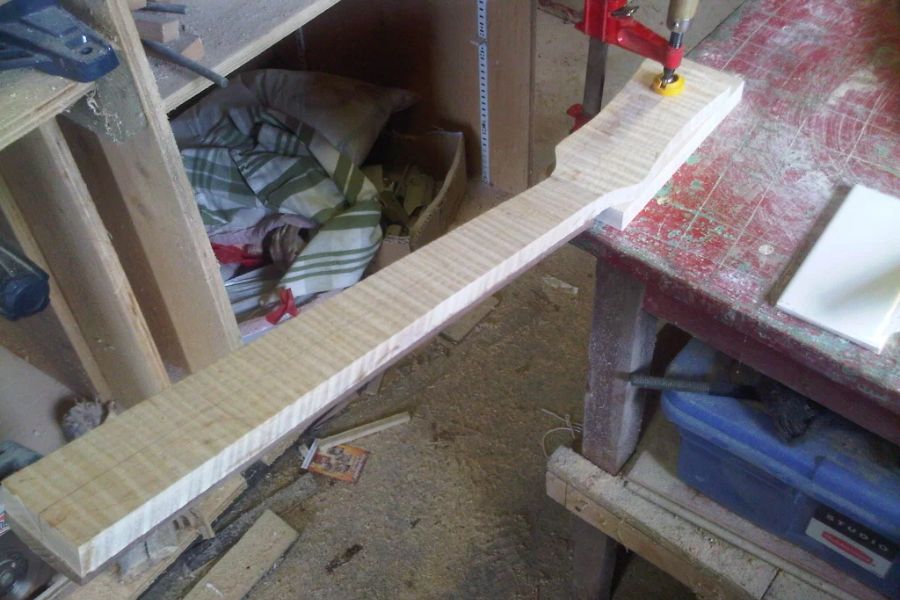
Preparing the Body Blank
Select a solid blank of tonewood to your preferences and budget. A more affordable option is to create a body blank by gluing two pieces of 3/4″ birch plywood together.
Trace the final guitar design onto the wood or plywood body blank.
Making a Template
Fashion a template from 1/4″ hardboard or acrylic, based on your design. This template will guide for accurate cuts.
Use a jigsaw with a fine-tooth blade to make precise edges.
After that, attach the template to the body blank with small screws in areas that will be routed out, such as the neck cavity and pickup areas.
Routing
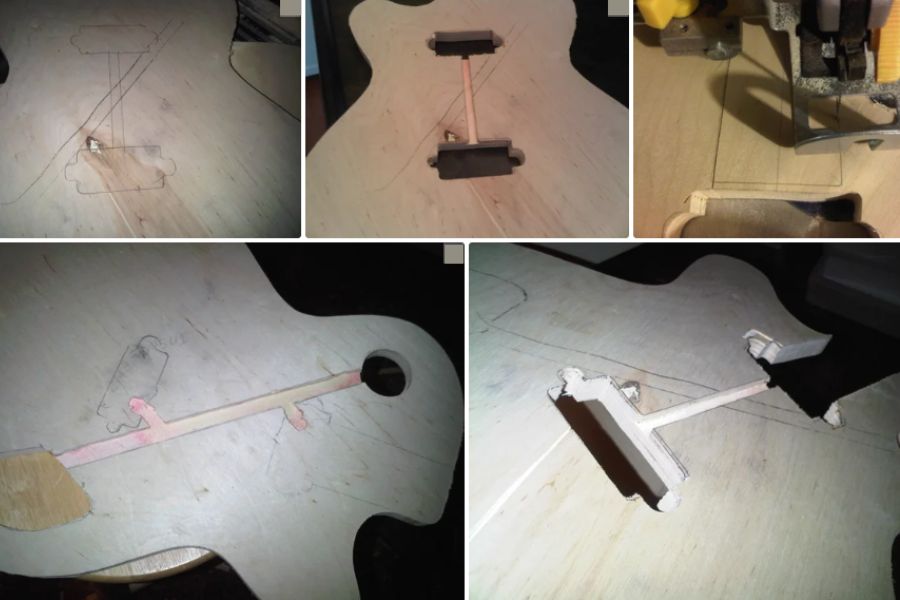
- Body Shape
Move the routing a little past the template line to begin. You should use a 1/2″x1″ router bit with a ball bearing guide. To make smooth cuts, move the router down 1/4″ at a time.
After cutting out the body’s main shape, smooth out the edges with a 1/2″ round over bit.
- Neck Pocket
Find out how deep the neck pocket needs to be by measuring the heel thickness of the neck and the bridge height, then adding the space for the string height.
Carefully route with a 1/4″ router bit to the depth you’ve set. Many times, test-fit the neck to make sure it fits snugly and correctly without over-routing.
- Pickup Cavities
How deep the pickups need to be is usually based on how tall they are and how long the screws that hold them in place need to be.
Following the lines you drew, use a 1/4″ bit to cut out the holes for the amps. To be sure, use a template. You can route by hand if you feel ready. You can see the lines better after the pickup rings are in place if you don’t go past them.
- Control Cavity
First, cut out the control plate from plastic, tracing its outline for precision.
Trace the control plate outline on the back of the guitar body. Route the cavity to the thickness of the plastic plate, starting shallow and gradually deepening.
Outline an additional 1/4″ inside the routed cavity to make extra room for wiring. Carefully route this expanded area, remember to leave adequate wood thickness at the bottom of the cavity.
- Holes
By drilling holes, you can set screws and other hardware that are needed to put the guitar together, like the neck attachment, pickups, bridge, string ferrules, control plate, and cavity.
Use different drill bits to get the right size and depth for the hardware. For the guitar’s structure and functionality, it is important to make these holes with a hand drill (or, better yet, a drill press for better accuracy).
Refine and Cleanup
After the framework and shaping are done, any rough edges need to be fixed and smoothed out so the guitar looks good and feels good. One way to do this is by adding contours.
Test-fit the neck, pickups, and control plate to make sure they all fit right. You can use sanders or hand tools to shape and polish the guitar body. In this step, the belly and arms are cut out, and the edges are smoothed out to make the garment look and feel finished.
Painting and Coating
Now it’s time for the painting and coating, do as the following step to achieve a professional and durable finish.
Preparation
- The body and neck of the guitar should be clean and free of dust.
- Use a coat hanger wire to hang the body and neck so they don’t touch or get dirty.
- Set up separate areas for drying and painting.
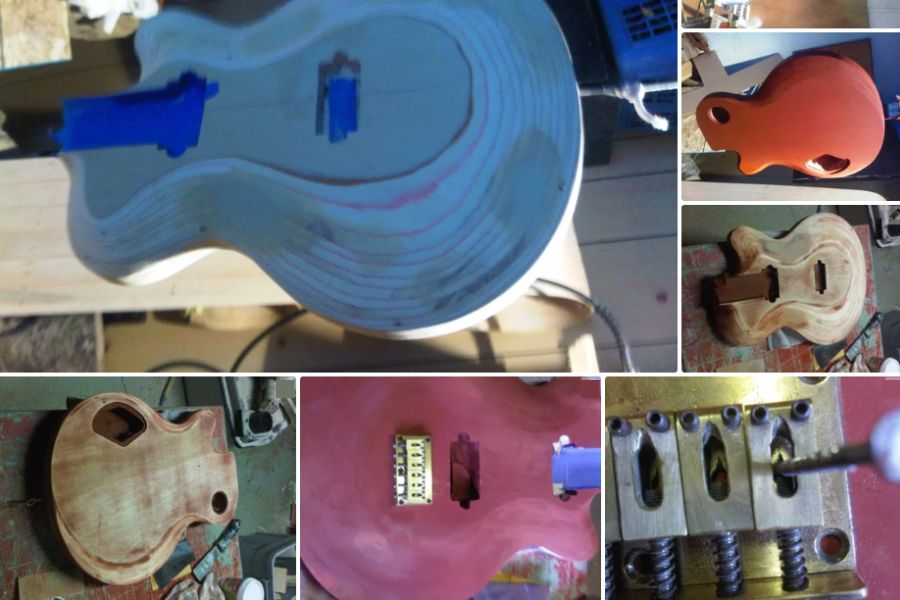
Painting
Spraying Tecnique
Use lacquer-based paint. Spray from a distance of 6 to 8 inches away from the body, starting and ending the spray stroke beyond the edges to avoid drips and uneven coating.
Apply a light “tack” coat first and allow drying for about 45 minutes. Follow with thicker coats for good coverage, watching for drips, especially on the sides.
After that, let the painted body dry for a few days or until it’s hard enough.
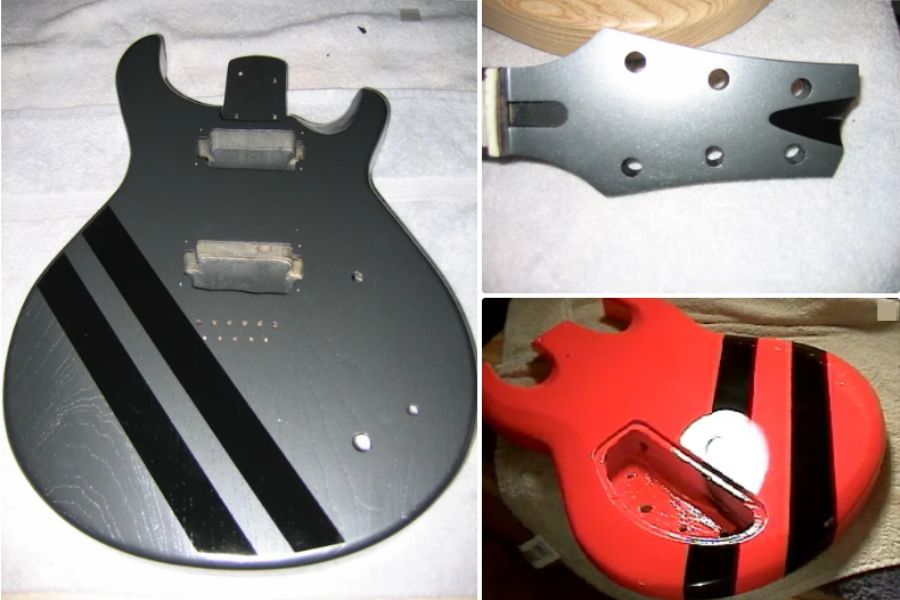
Adding Designs (Optional)
For additional designs like racing stripes or paint splatters, use appropriate masks and materials to apply designs over the base coat.
Clear Coating
Use lacquer-based clear coat, applying several layers for a durable finish. Let the clear coat to dry and harden, potentially for days to a month for it to be fully cured.
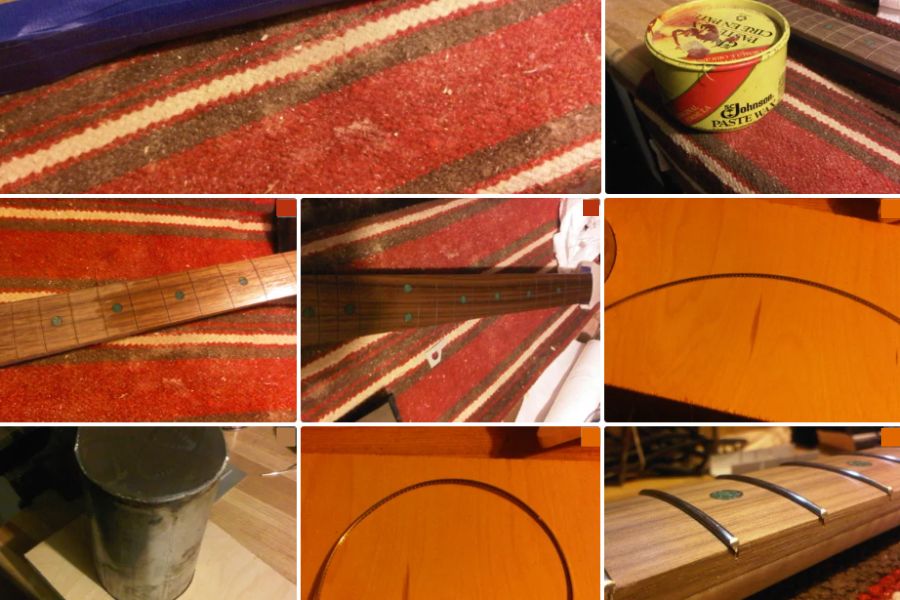
Final Wet Sanding and Polishing
Final Wet Sanding: Soak sanding paper (starting with 600 or 800 grit and moving up to 2000 grit) in water (optionally with a little Murphy’s Oil soap) and carefully sand the surface to smooth it out without soaking drilled areas excessively.
Polishing: Polish the surface to a shine, using either hand polishing techniques or a buffing attachment on a drill, with finer polishing compounds.
After polishing, clean off any residue and inspect the finish for any missed spots.
Tips for Success
- Always use compatible paint products (e.g., do not mix lacquer with water-based finishes)
- Practice good spraying technique to avoid runs
- Pay attention to drying and curing times so that the paint and clear coat are fully set before moving on to next steps.
- Use protective gear and work in a well-ventilated area, because you are using products with strong fumes.
Attaching and Assembling
Everything is now ready for you to assemble! It’s okay if you get distracted and start stringing the beads before you remember about the electronics. We’ll get there.
Glue choice
Along with the parts and tools we already talked about, you will also need a good wood glue to complete this step.
You should carefully choose the glue based on the specific needs of your project, including the materials being bonded, the need for water resistance, and whether the joint may need to be disassembled in the future.
| Type of Glue | Applications | Characteristics |
| Titebond Original | Wood parts assembly (neck-body, fretboards) | Water-based, strong bond, easy cleanup with water. |
| Titebond II & III | Similar to Original, with added moisture resistance | Longer open time, water-resistant (III more than II), III has a darker color. |
| Hide Glue | Attaching bridges, neck resets | Traditional, reversible with heat and moisture, dries hard for good vibration transfer, ideal for repairs. |
| CA (Cyanoacrylate) | Quick repairs, inlays, filling gaps | Quick-drying, available in various viscosities, hard and durable bond, requires solvents for cleanup. |
| Epoxy Resin | Strong bonding, joining non-wood materials, large voids | Two-part system, waterproof, hard and durable, bonds a wide range of materials, longer setting time. |
Structural Assembly
Neck Attachment: Glue or bolt the neck to the body of the guitar, depending on the type of neck (set-neck or bolt-on). For set-necks, use Titebond or a similar wood glue to make sure they are aligned and clamped correctly.
Fretboard Installation: Glue the fretboard to the neck, making sure it’s straight, and then clamp it down until it’s dry.
Inlays and Decorative Elements: Glue any inlays or decorative elements to the fretboard or body as required, using CA glue for smaller pieces or wood glue as appropriate.
Preparing for Electronics
You can paint the shielding or put copper tape inside the control cavity and under the pickguard to cut down on electromagnetic interference. For shielding to work, the coverage has to go on forever.
Drill necessary holes for tuners, bridge, string ferrules, and any other hardware. Also think about holes for wiring that runs between cavities and components.
Installing Hardware and Wiring Electronics
Hardware: Secure the tuners on the headstock and attach the bridge to the body, using the previously drilled holes.
Pickup: Place pickups in their cavities, running their wiring to the control cavity. There is the wiring path so that it doesn’t get in the way of other components.
Control Pots and Switches: Install the potentiometers and switches into the control cavity. Before tightening, make sure to not damage the finish.
Soldering: Following the wiring schematic for your chosen setup, solder the connections between the pickups, pots, switch, and output jack. You can use heat shrink tubing or electrical tape to insulate connections.
Knobs and Input Jack: Attach control knobs to the pots and secure the input jack in place.
Stringing and Setup: Once all electronics are installed and tested, string the guitar. Perform a basic setup, adjusting string action, neck relief, and intonation for optimal playability.
Final Checks
Plug the guitar into an amp and test all electronic functions—pickups, switches, volume, and tone controls—to ensure everything is working as expected.
Give the guitar a final inspection to ensure all parts are securely attached, the finish is intact, and there are no loose components.
Conclusion
The process of building an electric guitar from scratch is definitely difficult, but the satisfaction of finishing such a project is immeasurable. The dedication and hard work help you to connect deeply with your guitar. Have fun, and may your final product show how skilled you are and how much you love music.